

Feels like I've been on vacation around here, but really I've just been battling a really hectic schedule and a cold. I hope everyone had a wonderful Christmas last week. Ours was fantastic; we spent the day with my family and the night with Pat's, but no one warned me how much stress it is to host Christmas for the first time. So if any one is yet to host a family holiday, here's your warning: it's harder than it looks.
As tacky as it may seem, my family has a newish tradition of everyone creating an Amazon Wishlist to aid gift shopping. Throughout the year, we all add items we don't/can't/won't buy for ourselves. Then, right around Christmas, we clean it up removing anything we no longer want or need (honestly, I shop off my own wishlist all the time). This provides our family with a fool proof list of gifts at a variety of price points. Honestly, the hardest part is coordinating to make sure the same gift isn't given twice. It's made the holidays a lot easier for everyone.
I know, this seems soooo off topic for a post titled "DIY State Key Holder." The reason I share this tradition is because my Amazon list this year had a clear theme: monograms and the grand old state of North Carolina.
One of the items I had on my was a NC cutting board.
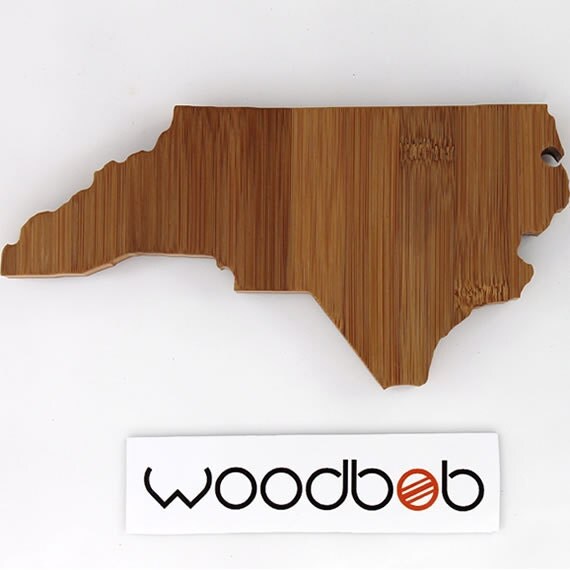
I was obviously very excited. My husband however, was not. After all the excitement died down, my sweet hubby said something along the lines of "that's the most impractical cutting board ever."
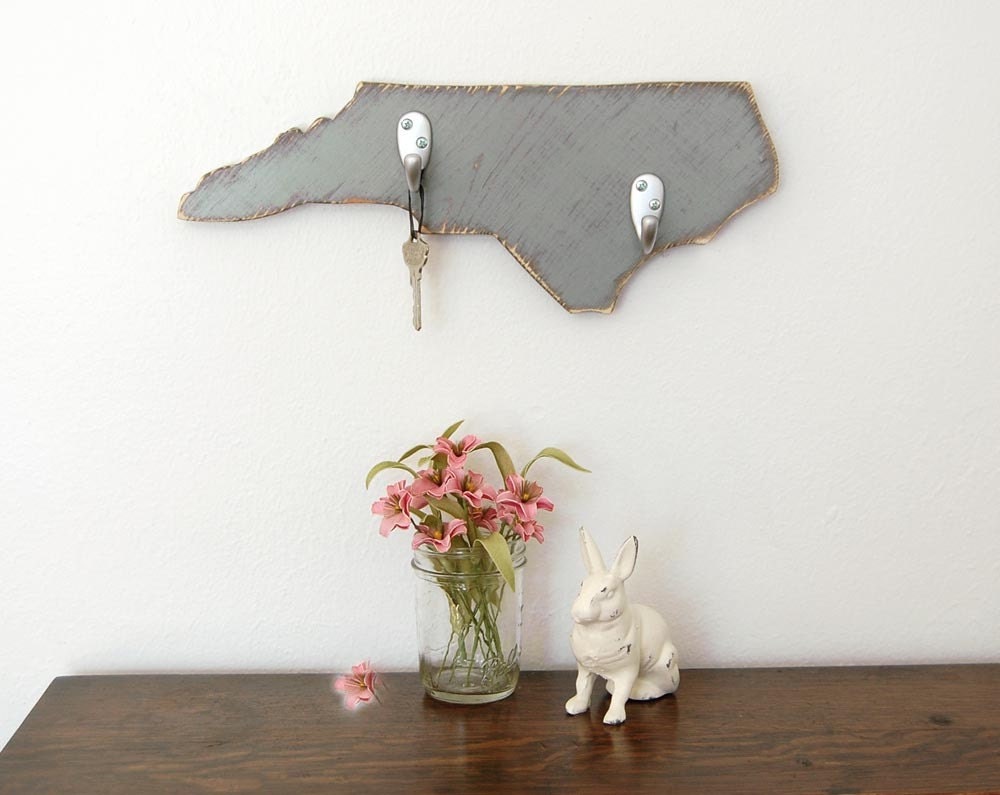
I couldn't disagree with the logic; all those nooks and cranies along state lines would collect all kinds of leftovers we don't want. Luckily there was one other item on my list that I could use the cutting board to create. A state key holder.
Boy, that was the longest intro into a DIY post ever. I guess I shouldn't leave the blog idle for so long. Now down to business.
Basically, I decided where I wanted to place our hooks, drilled the holes (for hooks and to hang it from), and screwed in the hooks.
I chose to place one of the hooks over Boone and one over Charlotte. No mysteries there. I used a Sharpie to mark where the holes would go.

Then I used a teeny, tiny bit to drill my holes.

Insider tip: I hardly ever know the actual size of the bit I use. No joke, I store my drill bits in a plastic bag. I just hold up the item I plan to place into the hole (in this case a hook) and see which bit is slightly larger than the core (not including the threads).

That oughtta do it. My bit always looks slightly smaller than the screw including the threads. I know, I'm a real pro. My dad and brother are shaking their heads at me.
I also drilled two holes in the back so I can mount it on the wall.

I considered using the hole that leather cord is tied through, but I figure the western side of my state will be unevenly weigthed once you throw two sets of keys on it, so two holes was the minimum to keep mine level. Maybe you could get away with one if the cities you love are Asheville and Wilmington.
Then I just twisted the hooks in by hand.

Two nails in the wall later and we're done.

Ok, it was two screws complete with drywall anchors. Being thorough is a good thing. The total cost of this project was the cutting board ($20). If you need to buy hooks, there like $3 for a 20-pack at Target.
PS, I feel obligated to say that Bed, Bath, and Beyond has a cutting board for every state available on it's webpage.
PPS, check out that barrel distortion! Everyone, tell my husband it's time for a new camera.
PPPS, if any one wants a peek at the Amazon Wishlists to see if it will help your family, here's the link to mine. Also useful for buying you favorite blogger a birthday present come February.
oh my word. I'm totally making this this weekend :P
ReplyDelete